All Posts By

Sarah H

Chocolate Brownies

I wish I could claim this recipe as my own, but credit where it’s due. This really simple Traditional Chocolate Brownie recipe is taken from The Hummingbird Bakery Cookbook, I’ve baked it time and time again and it always turns out well. The only change I have made is to replace the dark chocolate with milk chocolate, which is a personal taste thing. For a bigger chocolate hit you can add extra chocolate chips after you’ve stirred in the eggs. And for a more indulgent treat, serve with cream or ice cream. I’ve also adapted this recipe a couple of times to make it gluten free, instead of normal plain flour I used gluten free and added a couple of teaspoons of Xanthan gum.

Ingredients
200g milk chocolate broken into pieces
175g unsalted butter
325g caster sugar
130g plain flour
3 eggs

Preheat the oven to 170c/325F

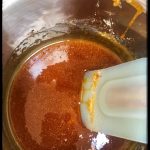
Place the chocolate and butter in a glass bowl over a pan of simmering water ensuring that the bowl doesn’t come into contact with the water. Wait until the butter and chocolate has melted and is smooth.

Remove from the heat and add the sugar, stirring until it is mixed well. Add the flour (and xanthan gum if you’re making the GF version) making sure it’s all incorporated then stir in the eggs. If you want to add extra chocolate chips, stir them in now. The mixture is quite dense and runny.

Transfer into your prepped baking tray and bake for about 30-40 minutes. This is quite a moist bake so when the edges are slightly coming away from the baking tray it’s most lightly done. Allow to cool and add a sprinkle of icing sugar. As lovely as these brownies taste on the day, they seem to taste even better the following too.

Apple Crumble

I’m not sure if throwback Thursday is still a thing, but either way I’m going a bit old school with today’s recipe- apple crumble. It’s actually a really easy recipe and a sure fire way to get you reminiscing about school dinners. Custard will go lovely with this, although I am yet to find a good recipe that makes the pink custard that my school used to do.

Ingredients
5 eating apples, peeled, cored and cut into cubes
2 tablespoons of golden caster sugar
1 teaspoon ground cinnamon
1 tablespoon of water

For the crumble
130g plain flour
60g golden caster sugar
60g unsalted butter plus extra for on top

pie dish, for this amount I used an 20cm diameter one.

Place the apple, a tablespoon of sugar, cinnamon and water into a pan and heat gently for about 5 minutes, then place the apple mixture into your pie dish.

In a food processor, or by hand if you’re hardcore, blend or rub together the flour and butter until you get a breadcrumb like mixture.

Place the crumble over the apple mixture, sprinkle the remaining sugar over the top and dot about 4 penny sized pieces of butter around the top.

Bake for about 25 minutes or until the top turns golden brown.

Double Choc-chip cookies

So this recipe was a bit of an experiment, I wanted to see if I could make a good biscuit without the need for loads of sugar. It’s taken a few attempts and along the way I thought I might as well make it gluten free too.

Ingredients
140g gluten free oats
165g plain gluten free flour
2 tablespoons raw cacao powder
2 tablespoons linseed
1 teaspoon gluten free baking powder
1 teaspoon xanthan gum
125g melted unsalted butter
3 tablespoons honey
2 medium eggs beaten
1 teaspoon vanilla extract

125g milk chocolate chips

Pre-heat the oven to 150C.

Put all the dry ingredients into a bowl and mix well.

Add the butter, eggs, honey and vanilla one at a time mixing well before adding the next ingredient.

Finally stir in the chocolate chips, you should end up with a firm mix that holds itself into a ball.

The mix should make about 14 cookies, break a piece of the dough, roll into a gold ball and flatten onto a baking tray before gently pressing down to flatten.

These should bake in about 15 minutes.

Betty Crocker Red Velvet Cake

This is just a short post, and ideal if you want to create something that looks and tastes good but a bit time poor.

Red Velvet cake always looks amazing and the Betty Crocker red velvet cake mix was on special offer so I gave it a go. You just need to add water, oil and eggs, mix and that’s pretty much it. I decided to make it as cupcakes rather than one big cake and topped off with buttercream icing, they were really moist and tasty.

Gluten free American style pancakes

Happy Pancake Day!! Although it may not be a public holiday (I definitely think it should be), it is a good excuse to dig out any sweet treats, stick on your pyjama bottoms and eat pancakes till you burst.

This is quite a thick and squidgy mixture but it gives thick and fluffy American style pancakes. They can be made the night before and warmed up in the morning, just add a generous dollop of honey or mascarpone.

Ingredients
145g gluten free plain flour
1 tsp gluten free baking powder
1 tsp xanthum gum
2 ½ tbsp caster sugar
140ml semi-skimmed milk
2 large eggs beaten
100g blueberries

Oil for cooking

Method
Sieve the dry ingredients into a large mixing bowl.

In a jug mix the beaten egg and milk together.

Add a small amount of the wet mix into the dry ingredients and whisk well, carry on slowly adding the wet mix while whisking until it is all well combined and there are no lumps.

This is a thick mix but you may want to add more milk, a tablespoon at a time, to make a more manageable mix.

You need a hot, well oiled frying pan, as the mixture is thick you want to cook on more of a medium heat to make sure the pancake is thoroughly cooked.

Add an ice cream scoop size of mixture into the pan and level out, place some blueberries on the top side, when the bottom side is done, flip.

Sort of gingerbread

When I dropped my little girl off at nursery she asked that when we got home could we make gingerbread men. ‘Of course’ I replied ‘I’ll get the ingredients ’. Of course I forgot and of course she didn’t, so I had to improvise slightly which is why this recipe is sort of gingerbread. A key ingredient in gingerbread is ginger, which was the one ingredient I didn’t have. I couldn’t face the tantrum, so carried on regardless, but it actually turned out to be a much softer taste so it was all good in the end.

Ingredients
12oz of gluten free plain flour plus some for rolling
2 tsp xanthan gum
1 tsp bicarbonate of soda
1 ½ tsp ground cinnamon
4oz butter, cut into cubes
6oz golden caster sugar
1 large egg beaten
4 tbsp golden syrup
1 tbsp honey

Clingfilm for chilling
Plus any decorations

In a food processor add all the sieved dry ingredients then add the cubes of butter and using a dough hook on a low speed allow to form a crumb mixture.

Once you have a fine crumb, add the egg, syrup and honey, once the mixture starts to come together stop the processor and gently pat into a ball.

Lightly dust a sheet of cling film, add the dough, wrap and chill for 20 minutes in the fridge.

Pre-heat the oven to about 150c and line a baking tray with greaseproof paper.

Remove your dough from the fridge and roll out to about ½ cm in thickness. Cut your desired shapes place on the baking tray. You could add chocolate drops to make features at this point.

Bake for about 15 minutes, the gingerbread will carry on cooking when it is out of the oven so to avoid it being overdone, remove it from the oven when the outside edges feel firm to the touch but the inside is a little bouncy.

Allow to cool and decorate as you wish.


Tie-Dye Cake

Heart Cake

This cake takes a basic sponge recipe and gives it a bit of a glam makeover. I used pink colouring with the plain mixture for this, but you could add a couple more for a rainbow effect;, use browns and greens for a camo’ effect or even black, brown and plain for an animal print effect.

Ingredients

  • 6oz self raising gluten free flour
  • 1 tsp xanthan gum
  • 6oz golden caster sugar
  • 6oz room temperature butter
  • 3 large eggs
  • ½ tsp vanilla extra
  • Decorations, I used plain icing with an edible glitter spray.
    Cookie cutters

Pre heat the oven to 160c and line your baking tin, this mixture is enough for two 8inch sandwich tins or a single larger tin.

I prefer the all in one method, so put all the ingredients into a food processor and mix until you have a well-combined, creamy mixture.

Pour into your baking tin/s and bake for about 20 minutes until the edge just starts to come away from the tin and the middle is soft and springy.

Allow to cook then using your cookie cutters gently cut out the shapes.

Tie-dye Cake

I didn’t want too much decoration on my cakes because I wanted the tie dye effect to be seen. So I went for a simple icing sugar and water mixture, I’d like to give instructions but when I make icing it starts off with a little icing sugar then I add too much water then I have to add more icing sugar, then it’s too gloopy so I add more water then I run out of icing sugar, have tons of icing and only use a fraction. Once the icing had set I used a light spray of edible silver spray.

Chocolate Ice Cream

Chocolate Ice Cream

So the minute I decided to make ice cream I scared the sun away, sorry about that. But in the meantime here is a chocolate ice cream recipe that should bring back some sunny memories. I use raw cacao powder in this recipe because it gives a really rich, chocolatey flavour. When it comes to chocolate I thoroughly believe that more is more, so feel to add some chocolate chips to this mixture when you transfer it to the ice cream maker. And for even more indulgence I make this recipe using double cream, which makes for an even creamier taste.

Ingredients

  • 500ml full fat milk
  • 175ml double cream
  • 1 Vanilla pod
  • 150g golden caster sugar
  • 3 egg yolks
  • 2 tbsp raw cacao powder

In a pan combine the milk and cream, scrape out the vanilla pod and add both the pod and seeds to the pan. Heat gently to just before it starts to boil, then set aside to cool. In a separate bowl, mix together the egg yolks and the sugar.

When the milk and cream mixture is cool enough not to scramble the eggs but warm enough to dissolve the sugar, remove the vanilla pod and gently add the egg mix, stirring as you add.

When all the sugar has dissolved add the raw cacao powder, I like to whisk this in as I feel it gives an airier texture.

Return the mix to the hob and gently heat through stirring continuously. You’re looking for a mixture that coats the back of a spoon, when you’ve achieved this, set aside and allow to cool completely.

When cooled, pour into the ice cream maker for between 40 and 60 minutes.

If too much dairy isn’t your thing, you can substitute the double cream for full fat coconut milk.